
Neglected is a strong word, let’s go with “Deferred Maintenance”.
You didn’t neglect anything, the right time to change your chain and sprockets hasn’t come up, until now! Since a motorcycle chain and sprocket set can last for quite a long time, it’s no wonder that many riders are not familiar with this task. If your motorcycle is due for a new chain and sprocket set, keep reading below to learn everything there is to know about this job.
Most riders, even DIY’ers take their bike into the shop when it needs a new chain. Replacing a chain requires a few specialty tools, and not too many people want to invest in rarely used tools. However, winter is the perfect time for this task. It’s not like prime riding weather in the summer when you don’t want your bike out of commission for a while. The off-season is the perfect season for the larger, slightly more complicated jobs.
How Long Do Chains Last?
“It depends”. I know, that’s the most frustrating answer. Similar to the lifespan of tires, brake pads, and other wearable components, chain lifespan varies based on riding style and owner maintenance. Riders who ignore regular chain care such as cleaning and lubrication, especially those who ride very high power sport bikes, may need a new chain after as few as 5,000 miles. While riders who don’t push their bikes very hard, and take care of the chain may see 30,000 miles!
Weather and motorcycle riding conditions are also important considerations. Wet and dirty (think adventure bikes) riding conditions will shorten the useful life of a chain, especially if the owner isn’t too diligent with maintenance.
Determine Chain and Sprocket Condition
As chains wear, their overall length will increase. The plates do not change but the bushings and rollers wear out. When the bushings and rollers wear out, the inner and outer plates have more free play between them. Once a chain lengthens beyond a set limit, sprocket teeth wear in an irregular pattern. It is always preferred to replace the chain and sprockets at the same. Also important to note, even a slightly worn sprocket is bad for a new chain. Premature chain wear is unfortunately very common as many riders opt for a new chain only. Even if the sprockets appear to be in good shape, replace the when you replace the chain.
Four ways to gauge chain health
- If the chain tensioner on the rear axle is maxed out, and the chain has more slack than the OEM specs – the chain is probably bad. This tip is for an existing chain on a motorcycle that you are familiar with. A chain that has too many links will have excessive slack as a result of improper fitment rather than chain wear.
- If you can pull the chain away from the rear sprocket without too much force, the chain is probably bad. A little movement is normal, but if you can see light between the chain and sprocket with a light pull, it’s new chain time.
- Visual inspection – this applies to O ring chains for street or dual-sport motorcycles. Like the name implies, O ring chains have an O ring between inner and outer plates which is designed to keep the grease in the pins/rollers. When these O rings break, fall out, or otherwise deteriorate, it’s time for a new chain.
- If a chain has an excessive amount of side to side play or links that aren’t snug with one another, it is most likely worn out.
As stated above, changing the sprockets at the same time as the chain is the best method, however you can gauge sprocket health by looking at the teeth. Teeth that form a sharp point or an irregular pattern between each other are a telltale sign of a bad sprocket.
Chain types and size
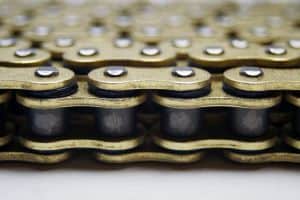
Modern motorcycle chains use a number classification system. #520 or #530 is a typical size. Chain number sizes correspond to measurements for pitch, pin size, width, and more. Simply replace the old chain with a new one of OEM specs and you are good to go.
Racing and off-road motorcycles use standard chains. Street bikes use O ring chains. Since they don’t use an O ring between the plates, standard chains are lighter and offer less drag on the powertrain. The tradeoff is more maintenance and reduced lifespan compared to O ring chains. As with chain size, refer to your owner’s manual or service manual to see what chain type your bike calls for and follow the OEM guidelines.
Gear Ratio Changes
It is quite common to make gearing changes to a motorcycle when replacing the chain and sprockets. While partially disassembled, it makes more sense to change the gearing than say, halfway through a chain’s useful life.
If you’d like more acceleration, going down a tooth on the countershaft sprocket or up a few teeth on the rear sprocket will achieve your goal. If you’d like to lower engine RPM on the highway, consider going up on the countershaft sprocket or down on the rear sprocket.
Important to note, sprocket size changes may require a different length chain.
Tools Needed
Beyond basic hands tools such as a ratchet and socket set, wrenches, pliers, you will need a few specialty and less common tools:
Chain breaker – breaker bar – socket for front axle – rear paddock stand (if no center stand) – torque wrench – service manual – angle grinder/grinding wheel (optional) – thread locking compound –
Replace Chain and Sprockets
Prep Work
- Buy chain
- Correct number of links
- Correct size, ie: 530
- Buy sprockets
- OEM or aftermarket
- Stock gearing or modified
- Verify you have access to specialty tools
- Chain breaker
- Rear stand (if no center stand)
- Socket for front sprocket nut
- Torque wrench
Steps
- Loosen front sprocket nut and rear axle nut
- Elevate rear wheel
- Break chain (optional: grind down pin heads)
- Remove rear wheel
- Remove and replace rear sprocket>
- Remove and replace front sprocket
- Replace wheel
- Replace chain
- Adjust chain tension, torque front sprocket, torque rear axle
Explanation
Loosen front sprocket nut and rear axle nut
This nut is typically very tight, if you don’t have access to air tools, use a breaker bar. A note of caution, this nut can be so tight that holding pressure on the rear brake while attempting to loosen the nut is common. Holding the rear brake will keep tension on the drivetrain while breaking the front sprocket nut loose. This is also the best time to loosen the rear axle nut as it is much easier now with the bike on the ground.
Elevate rear wheel
If your motorcycle doesn’t have a center stand, buying a quality rear paddock stand is well worth the money. Performing regular chain maintenance is a key part of owning a motorcycle and the rear paddock stand makes it much easier. For this project, removing the rear wheel is a must, so this may be the excuse you’re looking for to buy one!
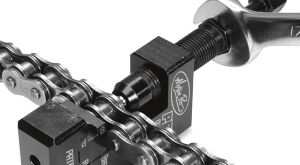
Break chain
If the chain has a clip-type master link, remove the clip and remove the chain. If it is an OEM or other chain without a clip, use the chain breaker tool to force out the pin, and remove the chain.
Remove rear wheel
You’ve already loosened the axle nut, so now finish removing the axle, chain adjusters, and rear wheel. Set the wheel down carefully so as to not damage the brake rotor.
Remove and replace rear sprocket
Loosen the sprocket nuts and remove the sprocket. Some service manuals will state that sprocket nuts are “single use” and that you should replace them. Torque the nuts to OEM specification and use a thread locking compound if the manual calls for it.
Remove and replace the front sprocket
As with the rear sprocket, the front sprocket nut may be “single-use”. Replace the front sprocket however you won’t torque it down at this step, that happens after the new chain is on and the bike is off the stand.
Replace rear wheel
Put the rear wheel, axle, and chain tension adjusters back on the motorcycle
Replace chain
Fit the new chain around the new sprockets and use the new master link to attach the two ends. Clip-type master links are thought to be less secure than master links that require the chain tool to secure. If you choose a clip type, be sure to fit the clip in the proper direction. If you use the chain tool, distort the pin head but don’t go so far as to crush the inner and outer plates together.
If you did not buy a specific length chain for your application, shorten the chain to match the number of links from the old chain.
Adjust rear wheel tension
Use the chain adjusters to properly adjust the rear wheel, torque the axle nut and sprocket nut to factory specs. The sprocket nut may call for a thread-locking compound or the use of a locking washer.
As you can see, this isn’t an overly complicated job. It is a bit more advanced than changing the oil but certainly within the capability of most DIY’ers. Please keep in mind, regular chain maintenance will extend the life of your chain. If you just spent the time and money to replace your chain, certainly be sure to take care of the new one to get the most life out of it!
You may also like to read: In-Depth Motorcycle Maintenance Series

Leave a Reply
You must be logged in to post a comment.