

When tuning your Harley-Davidson, understanding the importance of torque specifications can make a world of difference. Torque is crucial in ensuring each bolt and screw is tightened adequately for optimal performance. The right torque ensures every component of your Harley works harmoniously. Without the correct settings, you could be risking the safety and integrity of your ride. So what do you need to know, and where do we start?
Related Technical Resources: Harley Davidson Diagnostic Codes: The Most Complete Guide
Harley Davidson Spark Plug Gaps For The Best Performance
The Ultimate Motorcycle Chain Maintenance Guide For 2025
Understanding Torque And Why It’s Importance
Understanding torque and adhering to torque specifications ensures safety, reliability, and optimal performance.
Fundamentals of Torque
Torque is the twisting force that secures fasteners like bolts and nuts on your Harley. When applied correctly, it ensures that each component stays tight without stressing the parts it connects. Every bolt has a designed torque range that balances holding strength with material limits. Following torque specs isn’t just about numbers — it’s about keeping your Harley safe, reliable, and performing the way it was engineered.
Torque Measurement Basics
Torque is measured in units like foot-pounds (ft-lbs) or Newton-meters (Nm), which reflect the amount of rotational force applied to a fastener. For example, tightening an axle nut to 80 ft-lbs means applying a specific amount of leverage to hold it in place. Motorcycle manufacturers publish torque specs in service manuals for critical components, and these specs account for factors like bolt size, thread pitch, and the loads the fastener will endure while riding.
Tools and Equipment for Torque Application
The most important tool for applying accurate torque is Torque Wrenches. These come in different styles, such as click, beam, or digital, but all serve the same purpose: ensuring that the correct force is applied. For smaller and precision-based components, use a Torque Screwdriver. Accessories like socket adapters, extensions, and torque angle gauges can further improve accuracy. Regular calibration of torque wrenches is also important, since even small errors can lead to loose or overtightened bolts.
Effects of Over-Tightening and Under-Tightening
Both over-torquing and under-torquing can cause serious problems. Over-tightening stretches threads, weakens bolts, and can crack softer materials like aluminum. Under-tightening, on the other hand, leaves fasteners loose, which can lead to vibration, component movement, and even dangerous part failures on the road. Using the proper torque spec keeps parts secure without overstressing them.
Material Considerations
Not all motorcycle parts are made of the same material, and that matters when applying torque. For example, steel bolts threaded into aluminum engine cases need extra care since aluminum is softer and more prone to stripping. Coated or lubricated fasteners can also change torque requirements, as reduced friction may result in higher clamping force than expected. Always follow the manufacturer’s guidelines, as torque values are carefully calculated with materials in mind.
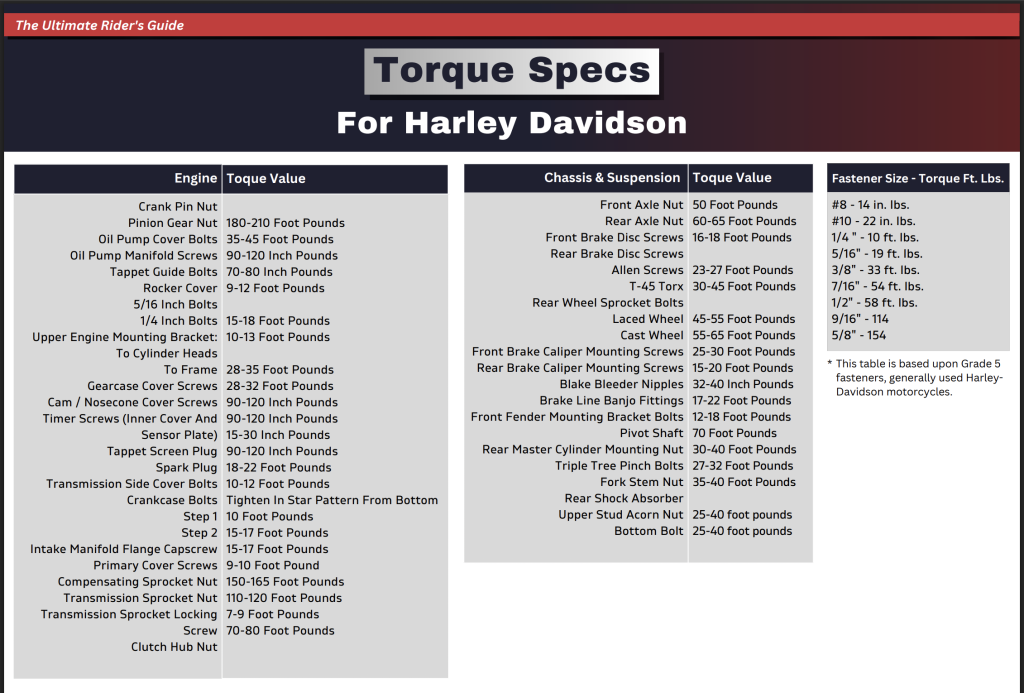
Harley Davidson Torque Specifications
Keeping your Harley Davidson motorcycle in prime condition involves paying close attention to torque specifications. Below, you’ll find detailed torque values for engine components, chassis, suspension, and specific models. Reference your Harley Davidson service manual for precise figures.
Engine Torque Specifications
For the engines in your Harley, follow these torque specs closely to avoid damage. For instance:
- Cylinder Head Bolts: When securing the cylinder head, you must apply a torque ranging from 7.4-16.3 Nm (65-145 in-lbs) in the proper sequence.
- Conrod Bolts: Connecting rod bolts should be tightened to 54 Nm (40 ft-lbs), but always double-check with your manual.
- Spark Plugs: Tighten to 20 Nm (14.75 ft-lbs) for optimal engine performance.
Chassis And Suspension Torque Specifications
The chassis and suspension hold your motorcycle together, so it’s crucial to get the torque right:
- Front Axle Nut: You’ll generally find a spec of 100-108 Nm (74-80 ft-lbs) for a snug, secure fit.
- Rear Axle Nut: Keeps the rear wheel secured, with typical specs at 95-105 Nm (70-78 ft-lbs) for most models.
- Mounting Bolts (Suspension): Rear shock absorber bolts range between 47-68 Nm (35-50 ft-lbs).
- Front Fork Pinch Bolts: 21-27 Nm (16-20 ft-lbs)
Brake Torque Specifications
Brakes are no joke. It’s about making sure your brakes are always there for you, especially when you need them most.
- Front And Rear Brake Disc Bolts: 22-27 Nm (16-20 ft-lbs)
- Front And Rear Brake Caliper Mounting Bolts: 38-48 Nm (28-35 ft-lbs)
- Front And Rear Brake Master Cylinder Clamps: 15-18 Nm (11-13 ft-lbs)
- Brake Pedal Mounting Bolt: 25-28 ft-lbs (34-38 Nm)
- Foot Peg Mounting Bolts: 30-35 ft-lbs (41-47 Nm)
Specific Fastener Torque Specifications
For various nuts, screws, and fasteners, here are some general guidelines:
- Primary Chain Case Cover Screws: Secure at around 13.6 Nm (120 in-lbs).
- Battery Terminal Bolts: 72-108 in-lbs (8-12 Nm)
- Voltage regulator mounting bolts: 90-120 in-lbs (10-14 Nm)
- Main circuit breaker: 25-36 in-lbs (3-4 Nm)
Step-By-Step Guide to Applying Torque
In performing maintenance on your Harley Davidson, it’s crucial to apply torque correctly to ensure safety and reliability. Using specific torque values, a quality torque wrench, and the right technique can significantly contribute to the overall performance of your motorcycle.
Preparation and Safety Tips
Before you begin, make certain you have the correct tools. You’ll need a torque wrench that suits the drive size of the sockets for your Harley’s bolts and nuts. Ensure the torque wrench is well-calibrated and in good working order. Always refer to your Harley Davidson service manual for the torque specifications for each component. Reference the Harley Davidson Safety Rules for additional safety tips while performing maintenance.
Key Points:
- Verify the calibration of your torque wrench.
- Consult the service manual for accurate torque values.
- Wear safety glasses to prevent injuries.
Torque Application Techniques
Begin by tightening bolts and nuts in the sequence recommended by the manufacturer, if applicable. Use a smooth and steady motion when applying force to the torque wrench; when it reaches the prescribed torque value, you will hear a ‘click’. It’s important not to apply additional force after the ‘click’ as this could cause over-tightening.
Torque Technique Steps:
- Align the bolt and nut properly.
- Apply force smoothly until you hear the click.
- Don’t overtighten past the click.
Adjusting Torque Values for Specific Parts
Each assembly on your Harley Davidson has unique torque specifications that you must follow strictly. For example, wheels and tires typically require 95-105 Nm (70-78 ft-lbs) for the axle nuts, whereas handlebars and foot controls will have different requirements. Be sure to adjust your torque wrench correctly for each part you’re working on.
Important Note:
- Always double-check the service manual for the correct torque values for each specific part.
Common Harley Davidson Torque Mistakes
Proper maintenance of your Harley Davidson is crucial, especially when it comes to torque settings. Avoid these common mistakes.
Skipping the Torque Wrench
Many riders rely on “feel” instead of a torque wrench. While experienced hands might get close, guessing can easily lead to overtightened or under-tightened bolts — both of which compromise safety.
Reusing Stretched or Damaged Bolts
Bolts that have been over-torqued or reused too many times can stretch beyond their limit. Even if they look fine, they may not hold the same clamping force. Always inspect and replace questionable fasteners.
Handling Gasket Surfaces
Proper torque sequences and values are crucial here. Uneven or too much torque can bust a gasket, leading to leaks or pressure problems. Make sure the surface is spotless before laying down a new gasket.
Ignoring Clean Threads
Dirty, corroded, or oily threads change the friction between bolt and nut, which alters the actual clamping force. Specs are based on clean, dry threads unless otherwise noted. Neglecting this can make torque readings inaccurate.
Forgetting Torque Sequences
On components like brake discs or engine covers, tightening bolts in the wrong order can warp parts. Always tighten in the recommended sequence, usually a cross or star pattern, to ensure even pressure.
Not Rechecking After Riding
Newly installed parts can settle after the first ride. Skipping a recheck can let bolts loosen with vibration. A quick post-ride inspection helps catch this before it becomes a problem.
Harley Davidson Torque Pro-Tips
- Always torque to spec with clean, dry threads unless the manual calls for lubrication or threadlocker.
- Tighten in stages — bring all fasteners snug first, then finish to spec in sequence.
- Check calibration — torque wrenches should be recalibrated at least once a year for accuracy.
- Use the right range tool — a torque wrench is most accurate in the middle of its scale, so use one sized appropriately for the job.
- Recheck critical bolts (like axle nuts or brake caliper bolts) after the first 50–100 miles following service.
Frequently Asked Questions
Ensuring your Harley Davidson is maintained correctly involves knowing the right torque specifications. These specs help you keep your bike in top condition. Let’s address some common questions you might have on the subject.
Do torque specs vary by Harley model and year?
Yes. Torque values can differ even within the same model family depending on year, trim, and component design. Always double-check your Harley Davidson service manual for your specific bike.
Can I reuse bolts if I torque them correctly?
Some bolts, especially those labeled “torque-to-yield,” should not be reused because they stretch when tightened. For critical areas like engine and brake components, replacing bolts is often recommended.
What happens if I over-tighten a bolt on my Harley?
Over-tightening can strip threads, crack softer materials like aluminum, or stretch bolts beyond their safe limit. This can lead to part failure and costly repairs.
Do I need different torque wrenches for different jobs?
Yes. A 250 ft-lb wrench is great for axle nuts, but not precise enough for smaller fasteners like brake or handlebar bolts. Having both a high-range and low-range torque wrench ensures accuracy across all jobs.
Should I use threadlocker with torque specs?
Harley often recommends using medium-strength threadlocker (like Loctite blue) on critical bolts. Always follow your service manual for guidance, since threadlocker changes the friction and can affect torque readings.
Final Thoughts
Following the correct torque specs on your Harley-Davidson is about more than tightening bolts — it’s about keeping your bike safe, reliable, and performing the way it was designed. By using the right tools, avoiding common mistakes, and double-checking your specs, you’ll prevent costly damage and ride with confidence.
For a complete approach to motorcycle upkeep, explore our other maintenance resources: the motorcycle tire pressure basics guide for keeping your tires safe, the motorcycle chain maintenance guide for drivetrain care, and our Harley-Davidson spark plug gap chart to ensure your ignition system runs smoothly. With a little time and the right knowledge, you can handle torque like a pro and keep your Harley on the road for years to come.